
Like many other software solutions Secure Network Analytics (formely known as Stealthwatch) uses self-signed certificates by default to secure communication between its Management Console (SMC) and components like Flow Sensor, Flow Collector or Data Store. While a setup like this is acceptable for lab and testing environment it’s always a good idea to use your internal PKI to secure access with CA signed certificates. Not only do we enhance our security posture by ensuring we are using correctly parameterized certficates that adhere to our internal security policies but we also satisfy those pesky auditors.
In this post we will look at how we can secure Stealthwatch 7.3.2 with CA signed certificates using a Windows CA. We will see the order in which we should replace our existing self-signed certificates and how Windows CA can be configured and used to sign our identity certificates quickly and reliably.
Overview
The Enterprise PKI setup we will be utilizing in this posts consists of an offline Root CA based on OpenSSL and an online Intermediate CA based on Windows CA (Windows Server 2019). The Root CA (OpenSSL) is only responsible for generating Intermediate CA certificates while the Intermediate CA (Windows) is responsible for signing identity certificates for our Stealthwatch appliances.
Note
This guide assumes that you already have a CA in place. We will only cover how to use an existing Windows CA to sign certificates! Flow Collector, Flow Sensor, Data Store and Management Console will be covered.
Order of operations
The order in which certificates are being replaced is important. If you replace the existing self-signed certificates the communication between SMC and its managed components will be re-established. If your trust store is missing the required certificates communication may fail!
While the official SSL/TLS Certificates for Managed Appliances 7.3 guide gives us a very detailed guideline the basic steps will be the following:
- Create a certificate template for Stealthwatch appliances
- Generate CSRs for all appliances
- Sign CSRs
- Import certificates to appliance truststore
- Import identity certificates
The identity certificates must be replaced in the following order:
- Data Store
- UDP Director
- Flow Collector 5000 Series Database
- Flow Collector 5000 Series Engine
- Flow Collector
- Flow Sensor
- Endpoint Concentrator
- Secondary SMC
- Primary SMC
For our lab setup only a subset of the appliances will be covered giving us the following order:
- Data Store
- Flow Collector
- Flow Sensor
- Primary SMC
Note
The configuration guide does not cover Data Store yet. While I did not experience any issues with replacing Data Store certificates first the configuration guide does not explicitly mention that Data Store certificates should be replaced first!
#1 Create a certificate template
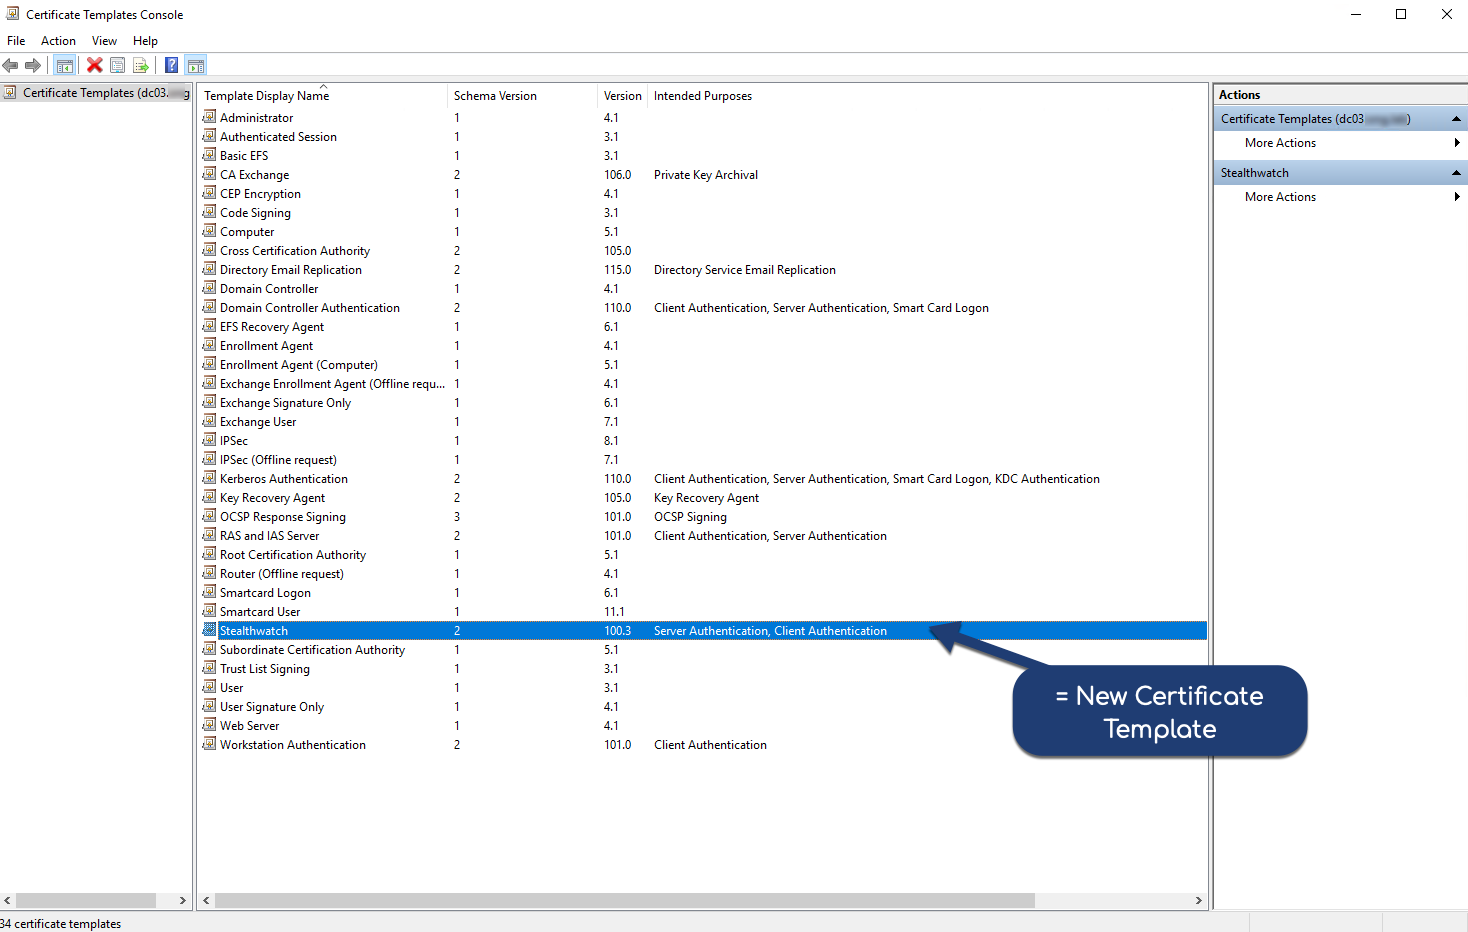
To sign our Stealthwatch identity certificates we will create a new certificate template and make it available to the Windows Certification Authority Web Enrollment service. Stealthwatch requires both Server Authentication and Client Authentication attributes in the certificate, so make sure the template is correctly configured before proceeding to the next step!
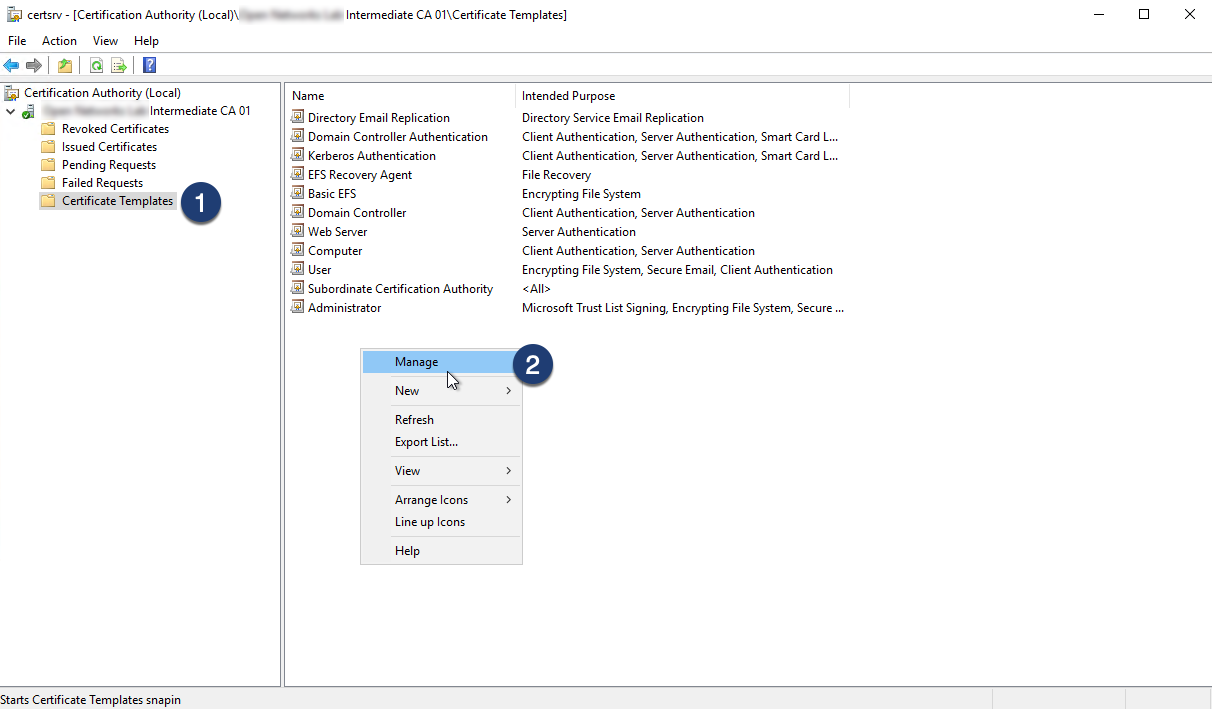
Step 01: Open Certificate Authority
Connect to your Certificate Authority and open the CA management console – certsrv.msc

Step 02: Navigate to Certificate Template, right click in the templates window and select Manage
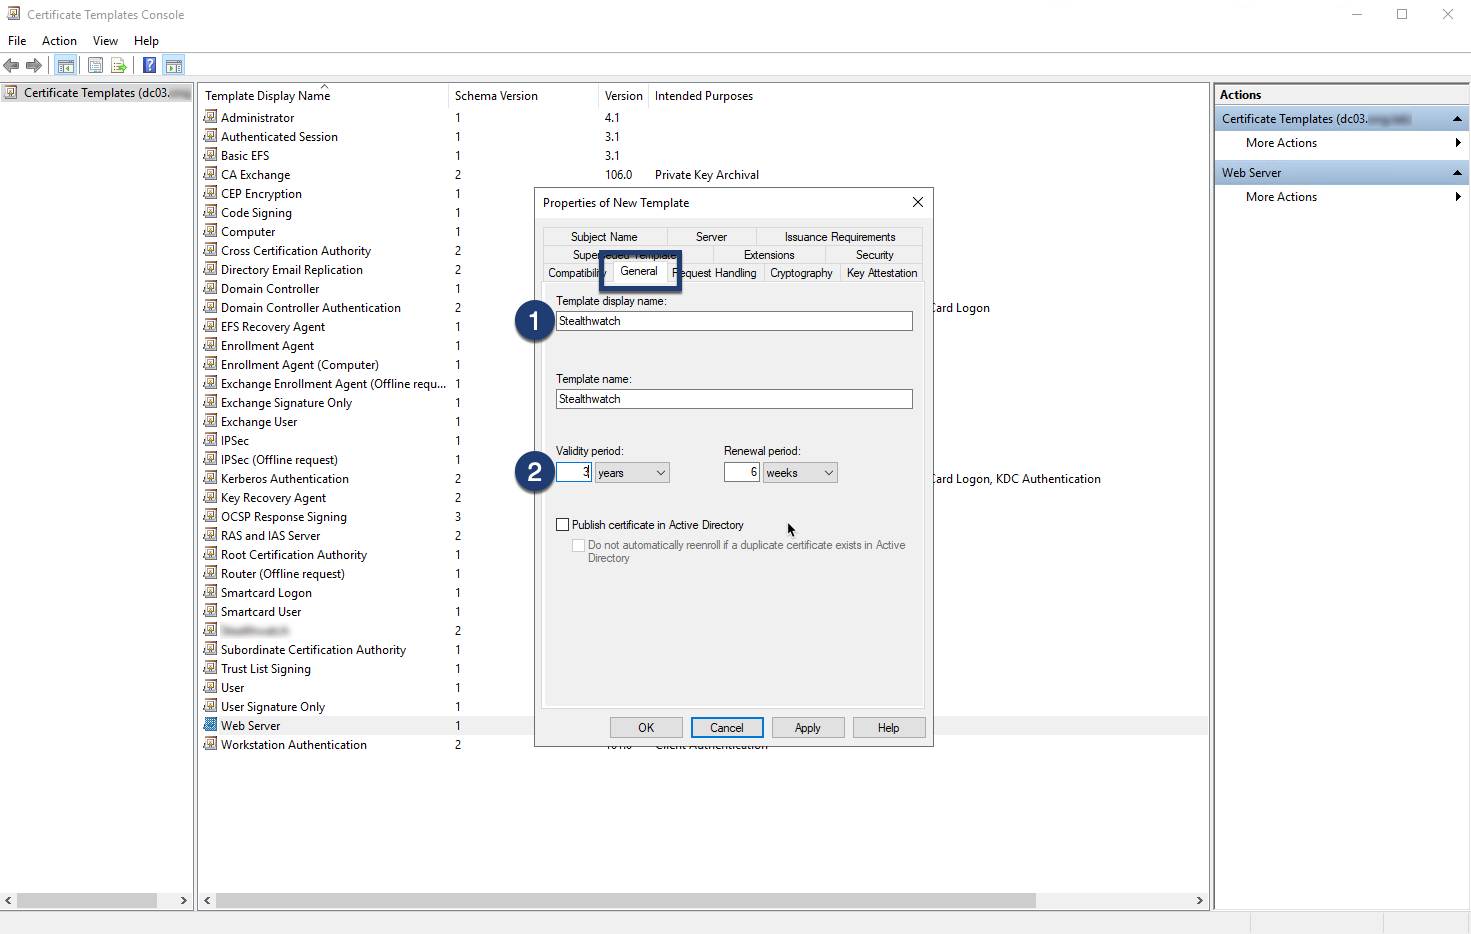
Step 03: Right-click the Webserver template and select Duplicate Template

Navigate to the General tab, set a desired Template display name (i.e. Stealthwatch) and validity period (i.e. 1-5 years)
Step 04: Navigate to the Extensions tab and edit Application Policies
Stealthwatch identity certificates require the Client Authentication and Server Authentication extension!

Step 05: Navigate to the Security tab, add the Enroll permission for your user and save template
Warning
If you do not follow this step you might not be able to select the template in the CAs web service!)


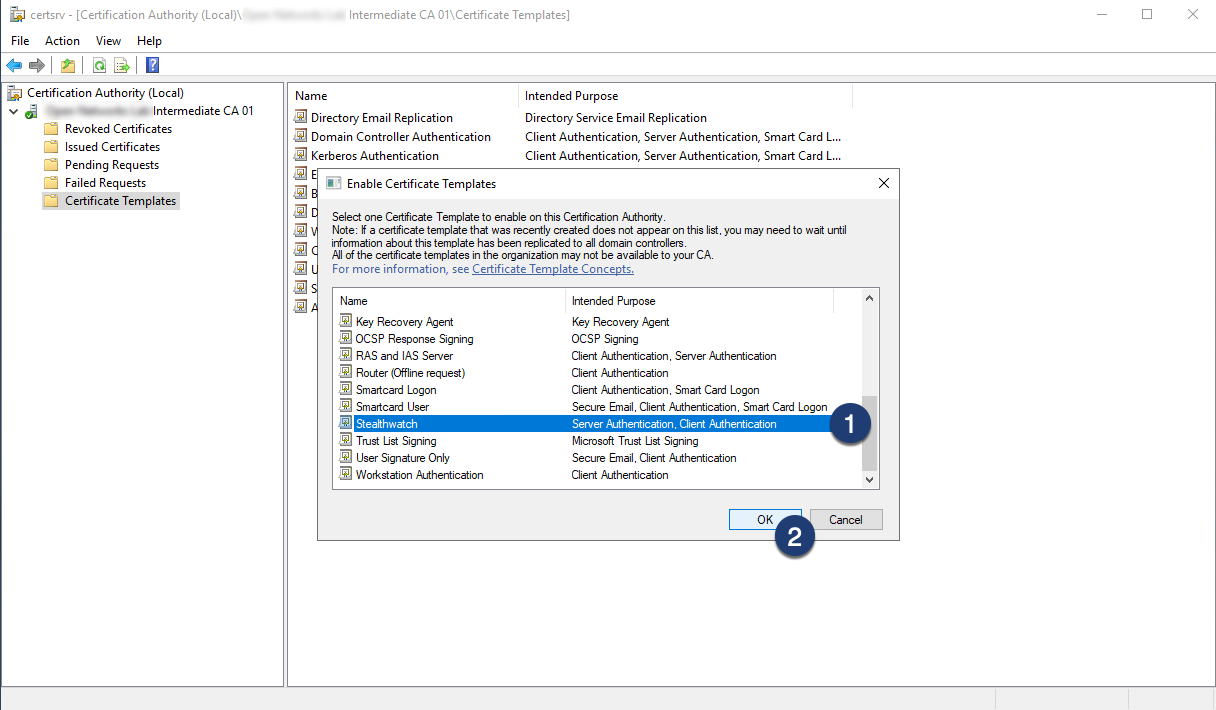
Step 07: Navigate back to certsrv and enable the certificate template

#2 Generate Certificate Signing Requests
You will need to generate CSRs for all appliances. Since the steps required to generate CSRs are identical for all device types I will only show how to generate a CSR for SMC. Do not forget to do the same for all other appliances!
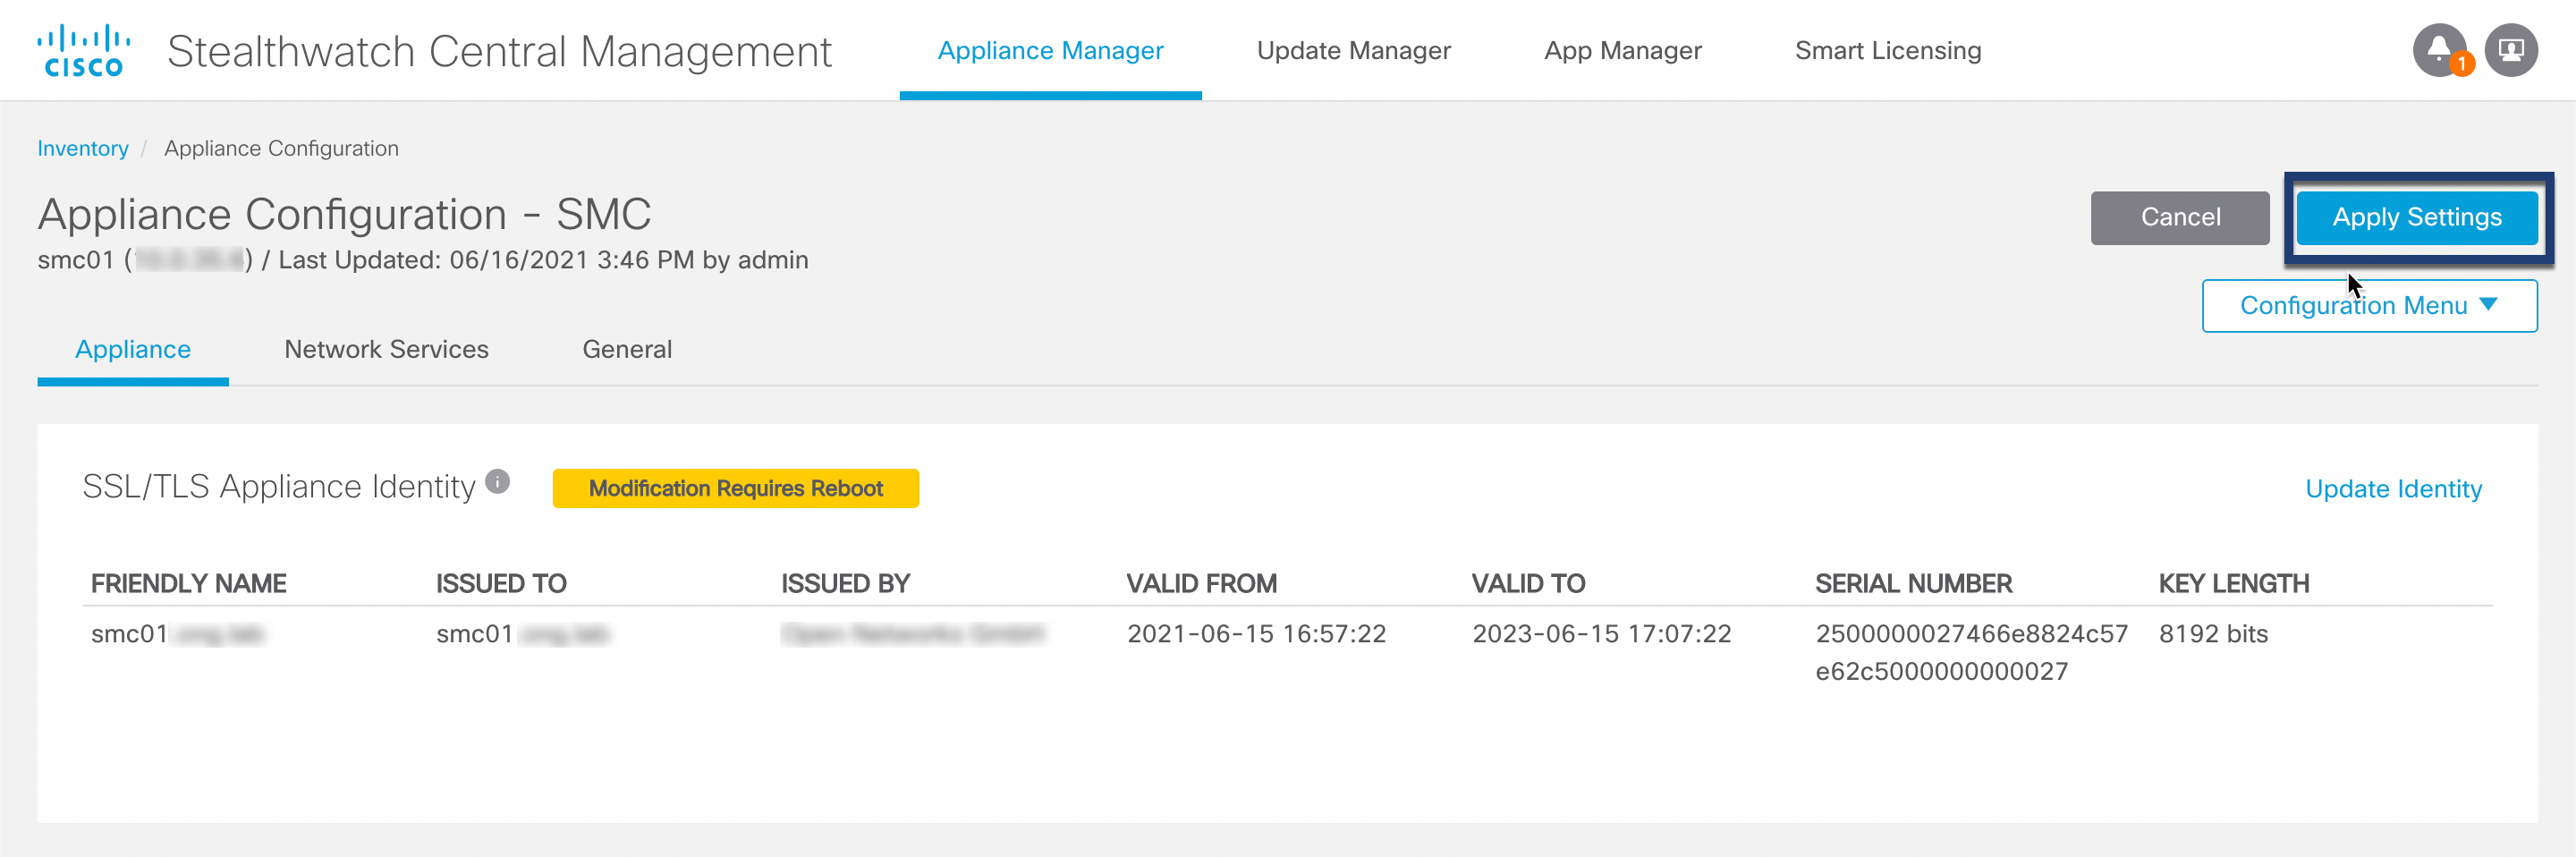
Step 01: Navigate to SSL/TLS Appliance Identity configuration for each $appliance


Step 02: Generate a new CSR (4096/8192 bit key length recommended)


Step 03: Download CSR

Now go back to #2 Generate Certificate Signing Requests and generate CSRs for all remaining appliances.
#3 Sign Certificate Signing Requests
Time to sign the CSRs using Windows Certification Authority Web Enrollment service and download both signed certificates and the certificate chain (Certificates of both Intermediate CA and Root CA)
Step 01: Open your browser and navigate to CA Web Enrollment service (https://ca01.example.com/certsrv)

Step 02: Sign CSR using the appropriate certificate template

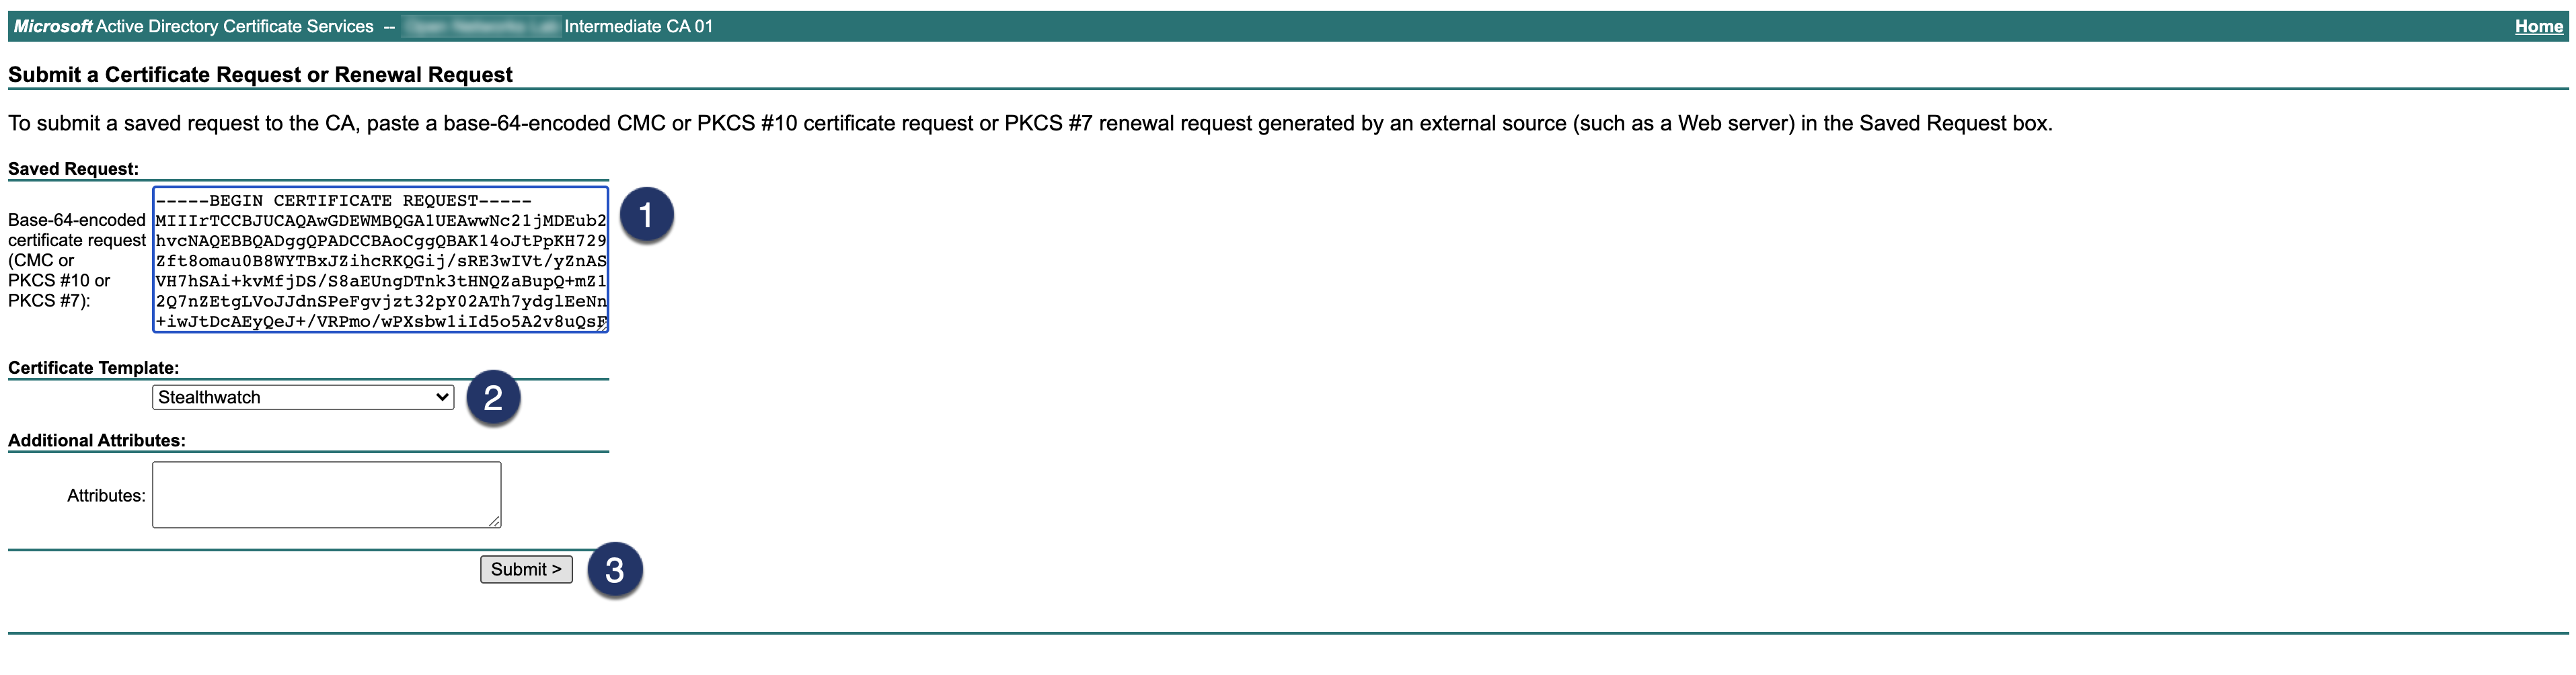
Step 03: Download signed certificate and certificate chain

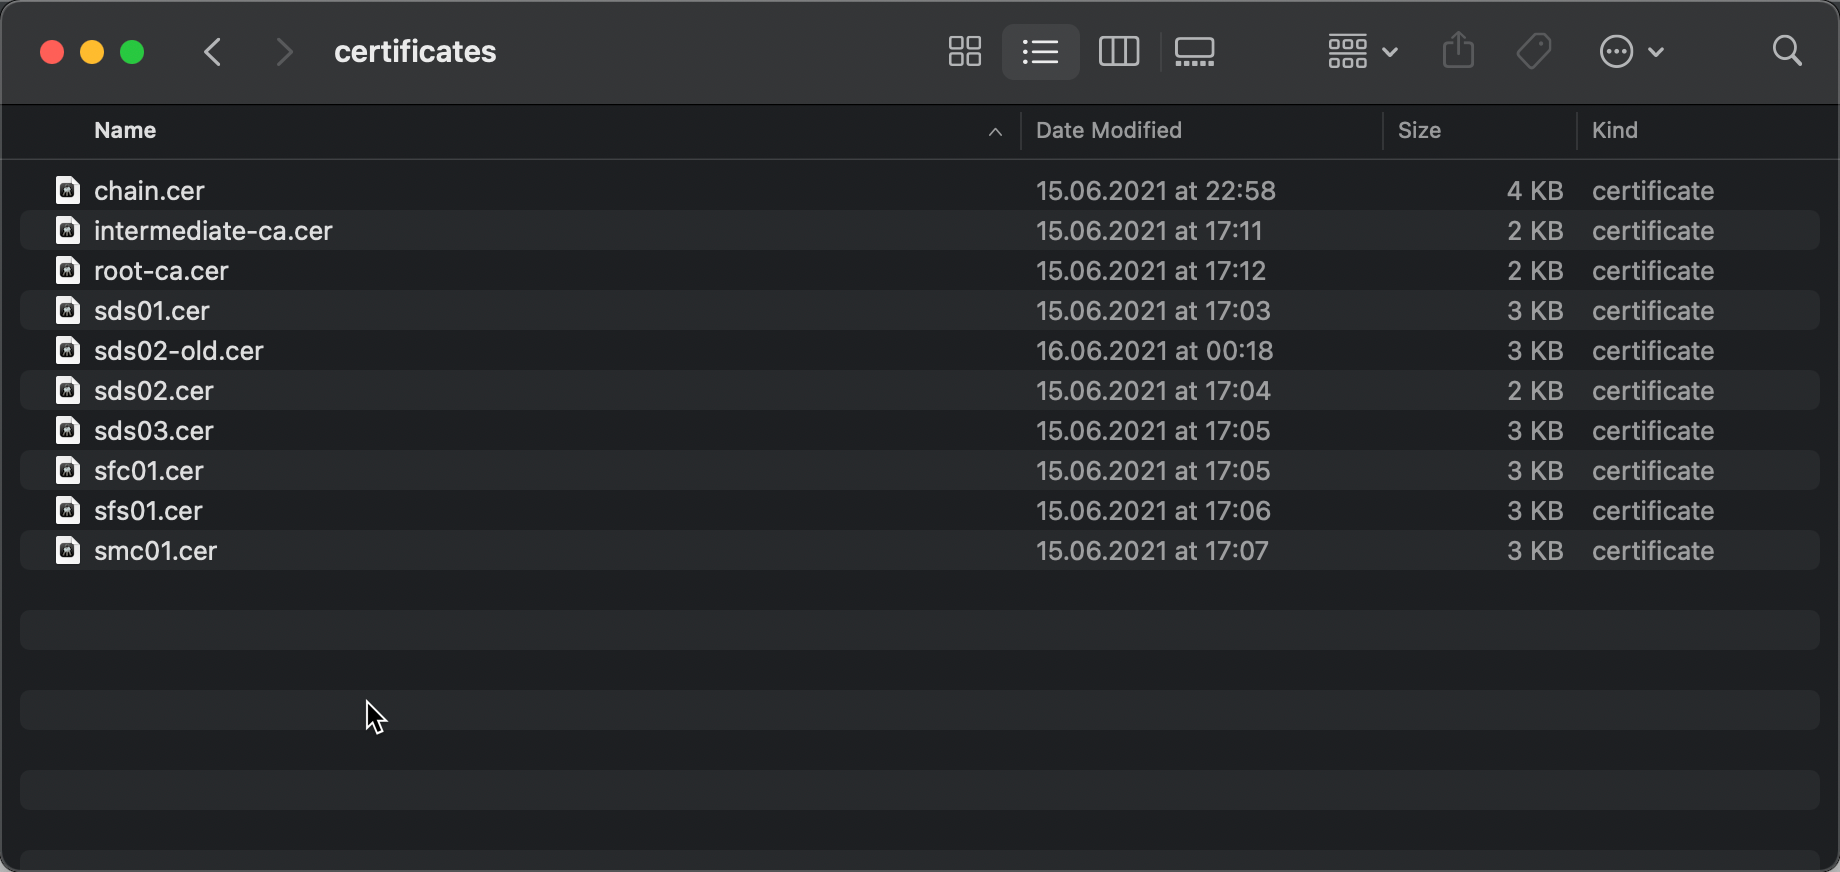
Tip
Rename certificate files after download, having dozens of files named certfile.cert will get confusing quickly.
Step 04: Extract CA certificates from PKCS#7 file and create a chain in PEM format (required for Identity Certificate import)
Note
This step required OpenSSL and should work on any Linux or OSX workstation. If you are using Windows you will need to install OpenSSL before proceeding
openssl pkcs7 -print_certs -in certnew.p7b

 subject=/C=AT/ST=Vienna/O=Example/OU=Example Lab Certificate Authority/CN=Example Lab Intermediate CA 01
 issuer=/C=AT/ST=Vienna/O=Example/OU=IT/CN=Example Lab Root CA/[email protected]
 -----BEGIN CERTIFICATE-----
 (...) OMITTED INTERMEDIATE CA CERTIFICATE (...)
 -----END CERTIFICATE-----

 subject=/C=AT/ST=Vienna/O=Example/OU=IT/CN=Example Lab Root CA/[email protected]
 issuer=/C=AT/ST=Vienna/O=Example/OU=IT/CN=Example Lab Root CA/[email protected]
 -----BEGIN CERTIFICATE-----
 (...) OMITTED ROOT CA CERTIFICATE (...)
 -----END CERTIFICATE-----
touch certificate-chain.pem
echo "
-----BEGIN CERTIFICATE-----
(...) OMITTED INTERMEDIATE CA CERTIFICATE (...)
-----END CERTIFICATE-----
" >> certificate-chain.pem
echo "
-----BEGIN CERTIFICATE-----
(...) OMITTED ROOT CA CERTIFICATE (...)
-----END CERTIFICATE-----
" >> certificate-chain.pemNow that you have extracted the certificates create a PEM file in the following format:
 -----BEGIN CERTIFICATE-----
 (...) OMITTED INTERMEDIATE CA CERTIFICATE (...)
 -----END CERTIFICATE-----
 -----BEGIN CERTIFICATE-----
 (...) OMITTED ROOT CA CERTIFICATE (...)
 -----END CERTIFICATE-----
Step 06: Save both Intermediate CA and Root CA certificates in seperates files (required for Trust Store)
 -----BEGIN CERTIFICATE-----
 (...) OMITTED INTERMEDIATE CA CERTIFICATE (...)
 -----END CERTIFICATE-----
-----BEGIN CERTIFICATE-----
(...) OMITTED ROOT CA CERTIFICATE (...)
-----END CERTIFICATE-----You should have three files now. One containing the certificate chain (i.e. chain.pem), one containing only the root CA certificate (i.e. root-ca.pem) and one file containing only the intermediate ca certificate (i.e. intermediate-ca.pem).
Before proceeding to the next step make sure that you have generated all your identity certificates and extracted the certificate chain correctly. Follow step 1 through 3 for every appliance before continueing!
#4 Import certificates to appliance trust store
Now that our identity certificates are ready for use it’s time to update the trust store of each appliance. The trust store is a collection of certificates that the appliance considers trustworthy. Whenever a TLS connection is being established and a Stealthwatch appliance is being presented with a certificate it will check its certificate trust store to make sure that the certificate was signed by a trusted CA.
We will need to update the truststore for all appliances. The following table lists the required certificates that must be imported:
| Appliance | Certificate |
|---|---|
| Management Console | Root CA Intermediate CA Management Console (self) Flow Collector Flow Sensor Data Store |
| Flow Collector | Root CA Intermediate CA Management Console Flow Collector (self) |
| Flow Sensor | Root CA Intermediate CA Management Console Flow Sensor (self) |
| Data Store | Root CA Intermediate CA Management Console Data Store (self) |
The steps to import a certificate to the trust store are the following:
Step 01: Navigate to Appliance Configuration
Step 02: Open Trust Store Configuration
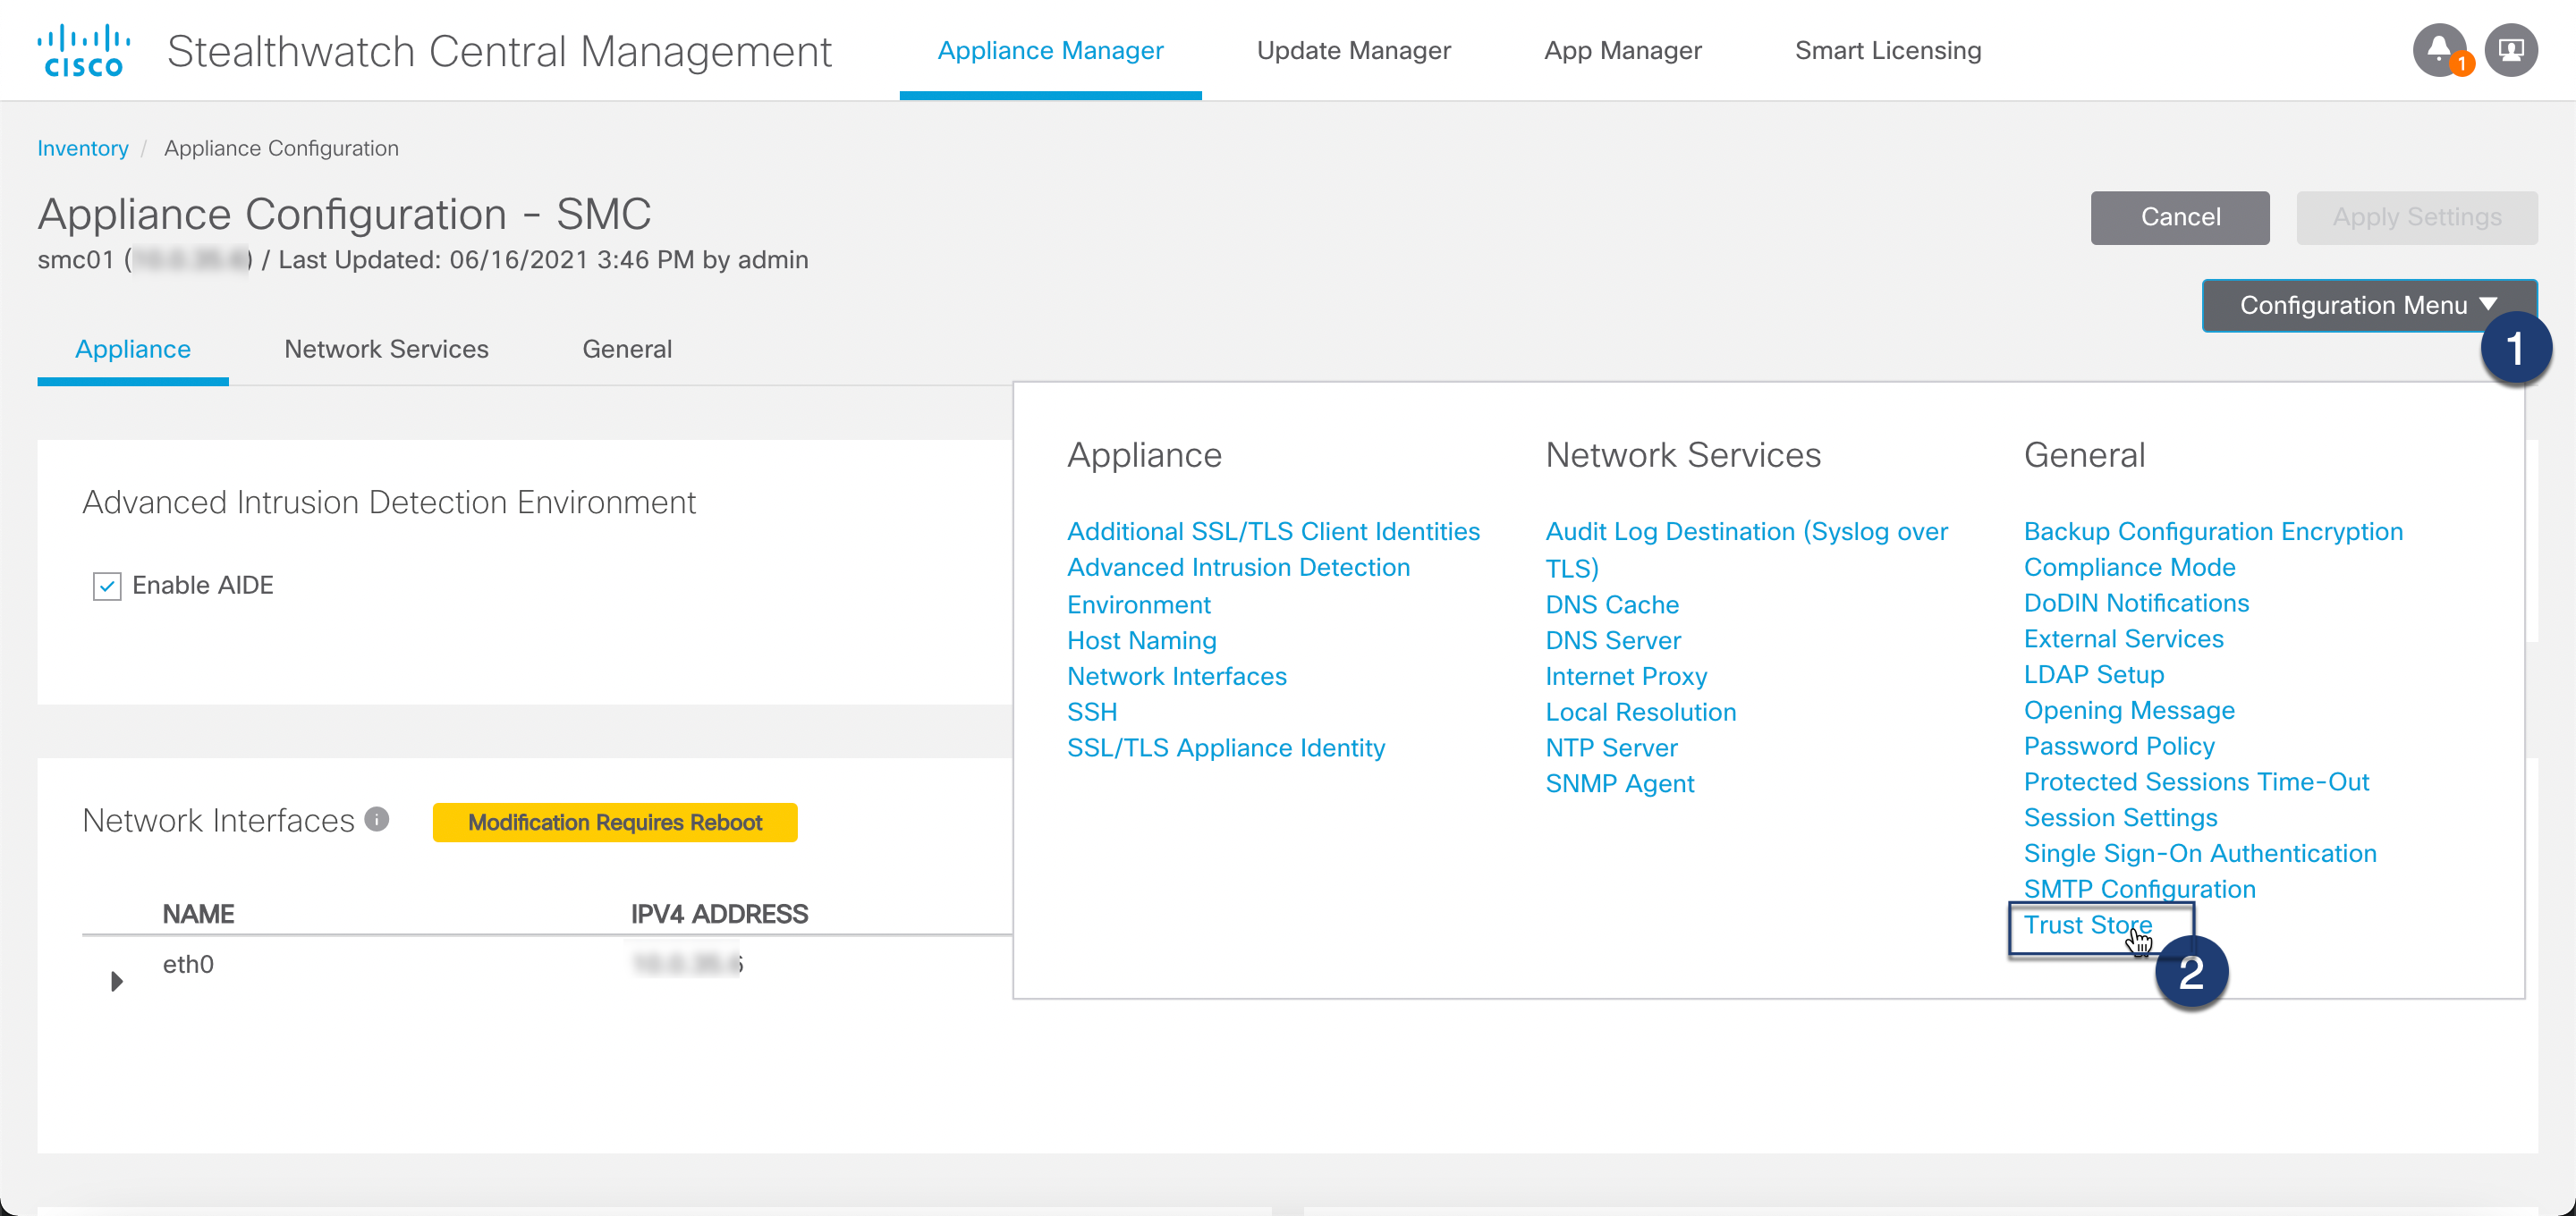
Step 03: Import certificate

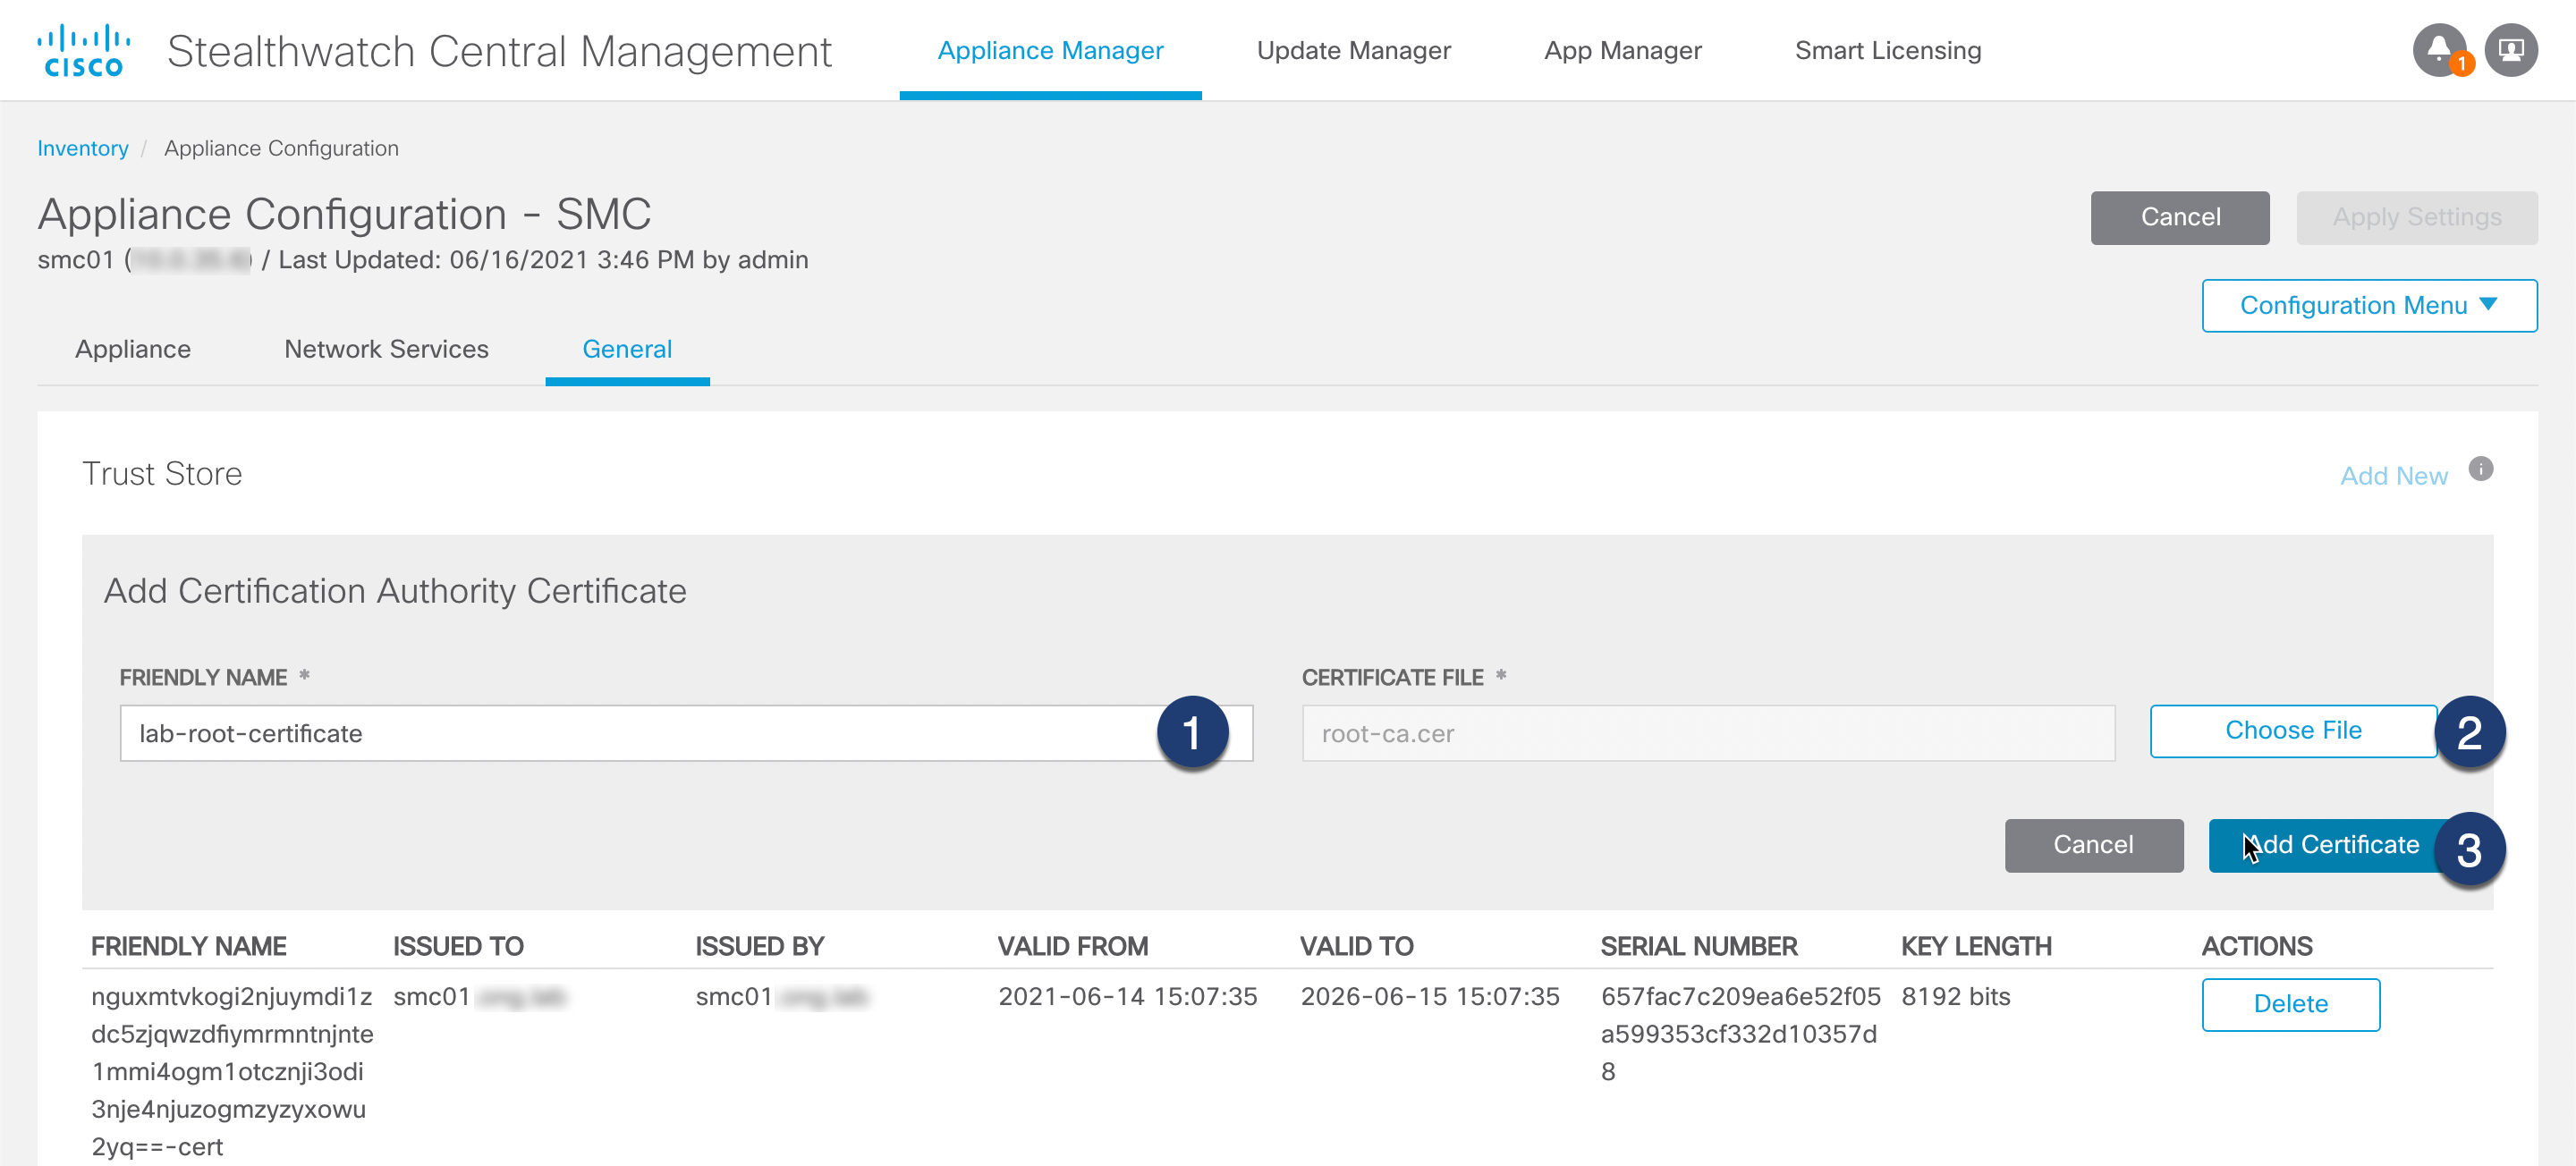
Step 04: Apply configuration

Before proceeding to the next step make sure that you have imported all trusted certificates according to the Trust Store Requirements table above!
#5 Import identity certificates
Last but not least we can finally replace our existing certificates. To do this we will once again go to Appliance configuration and replace identity certificates in the following order:
- Data Store
- Flow Collector
- Flow Sensor
- Primary SMC
Step 01: Navigate to Appliance Configuration
Step 02: Import signed certificate and certificate chain in PEM format

Step 03: Apply configuration
Warning
The webserver will restart after applying this configuration. Wait 5 minutes after applying the configuration and verify that the config channel between SMC and the other appliance is up again before proceeding to the next appliance!

# 6 Verification
After importing your identity certificates you should see all appliances with state Up under Central Management. To verify that identity certificates were correctly replaced you can either use your browser and navigate to each appliance or use openssl via CLI:
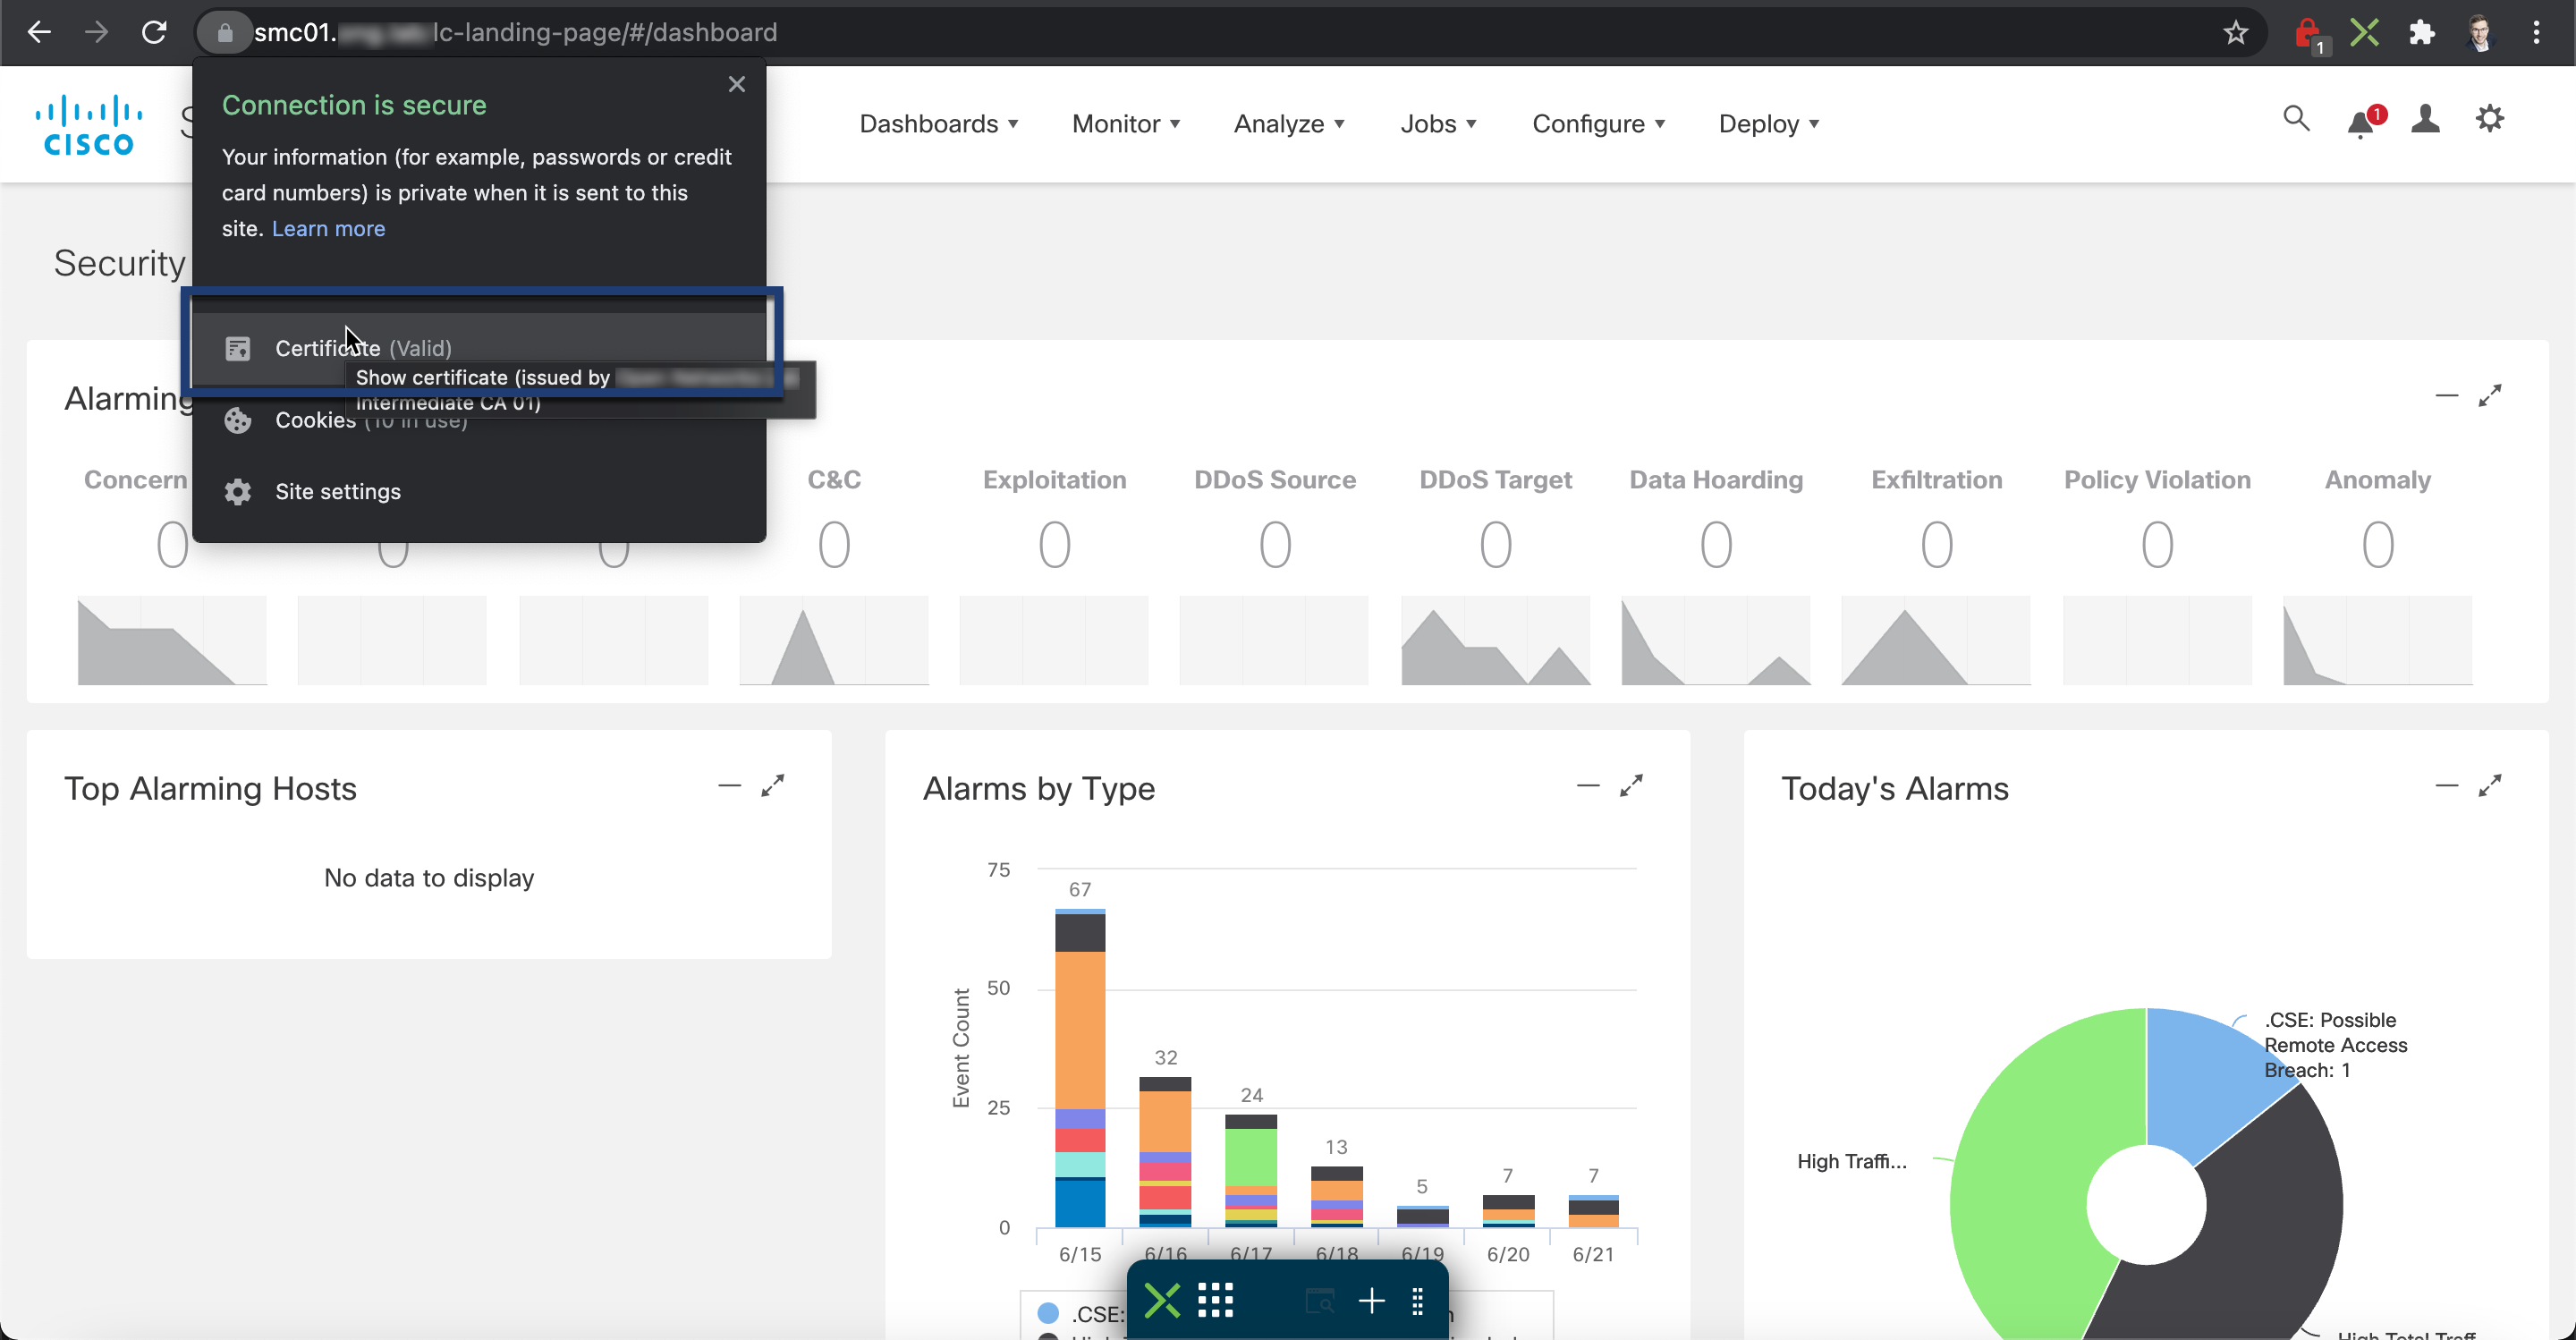

echo | openssl s_client -showcerts -servername gnupg.org -connect smc01.ong.lab:443 2>/dev/null | openssl x509 -inform pem -noout -text

 Certificate:
     Data:
         Version: 3 (0x2)
         Serial Number:
             25:00:00:00:27:46:6e:88:24:c5:7e:62:c5:00:00:00:00:00:27
     Signature Algorithm: sha256WithRSAEncryption
         Issuer: C=AT, ST=Vienna, O=Example, OU=Example Company Certificate Authority, CN=Example Company Intermediate CA 01
         Validity
             Not Before: Jun 15 14:57:22 2021 GMT
             Not After : Jun 15 15:07:22 2023 GMT
         Subject: CN=smc01.example.com
         Subject Public Key Info:
             Public Key Algorithm: rsaEncryption
                 Public-Key: (8192 bit)
                 Modulus:
                 (...)
                 Exponent: 65537 (0x10001)
         X509v3 extensions:
             X509v3 Extended Key Usage:
                 TLS Web Server Authentication, TLS Web Client Authentication
             X509v3 Subject Alternative Name:
                 DNS:smc01.example.com, IP Address:198.18.0.100
             X509v3 Subject Key Identifier:
                 25:E0:6C:13:42:40:B1:A4:E1:88:21:0B:E9:EE:DF:57:BA:D2:71:DF
             X509v3 Authority Key Identifier:
                 keyid:1C:9C:0F:81:83:98:20:EE:B3:59:5D:CB:8D:C1:AB:B7:C6:9F:0D:36
             X509v3 CRL Distribution Points:
                 Full Name:
  URI:ldap:///CN=Example%Company%20Lab%20Intermediate%20CA%2001,CN=dc03,CN=CDP,CN=Public%20Key%20Services,CN=Services,CN=Configuration,DC=example,DC=com?certificateRevocationList?base?objectClass=cRLDistributionPoint

             Authority Information Access:
                 CA Issuers - URI:ldap:///CN=Example%Company%20Lab%20Intermediate%20CA%2001,CN=AIA,CN=Public%20Key%20Services,CN=Services,CN=Configuration,DC=example,DC=com?cACertificate?base?objectClass=certificationAuthority
      (...)
     Signature Algorithm: sha256WithRSAEncryption
     (...)
2 comments
Found this very helpful. Was setting up a similar lab and I really dont think the guides are very clear in exactly what you need to achieve the required certificates. It’s extremely easy to mess up due to Ciscos infamous GUI-designs. And the CSR-download also doesnt generate the private keys so you are kind of “in the dark” if something goes wrong.
Bottom line, be sure to use a supported browser or your CSR will be canceled and you cannot replace the identity certificate. In windows you can just easily combine the “chain” yourself if you can export it somehow, but that will depend on your CA and organizations general certification skills (which tend to be sub-par).
So for whom it concearns….if you cancel your CSR, while trying to import other certs to the truststore, it’s probably your browser just try another one and it will “stay” in the right step and you can go back and just upload the signed cert with the chain!
What needs to do if there is HA setup?